eOrganic author:
Dan Egel, Southwest Purdue Agricultural Center
Source:
Adapted from: Egel, D. 2006. Scouting for vegetable diseases. New Agricultural Network. http://new-ag.msu.edu/ (verified 15 Mar 2010).
Introduction
The key to managing vegetable diseases is to anticipate. Attempting to manage a disease after its appearance is not as effective as preventative management. This is true regardless of whether one is considering fungicide applications or cultural controls such as crop rotation. In addition, the National Organic Program requires that a certified organic farmer use all available preventive practices before deciding to apply a pesticide. See related article How to Determine Whether You Can Use a Product for Disease Management on Your Organic Farm.
Scouting
If preventative management is the underlying theme to organic vegetable disease management, why should one scout for diseases? Doesn’t the concept of scouting for disease imply reactive management?
Let’s think about the word scout as a military term. Scouts precede the army in an attempt to determine the enemy’s whereabouts and movements. In so doing, it is possible to react to the enemy’s movements and to prevent an enemy surprise attack. In this sense, scouting is both reactive and preventative. Vegetable disease scouting should be the same.
Preventative schemes include crop rotation and variety selection. Management schemes that include these factors have to be developed prior to the growing season. However, the length of time between crops, which crops should be included in the rotation and what disease resistance is needed in varieties are questions that can only be answered with knowledge of one’s own cropping systems.
Occasionally, knowledge gained in scouting will cause one to make rapid changes in management. For example, a fungicide application schedule may change, or you may decide to harvest a crop early, if a disease makes an appearance in your field.
The remainder of this report will cover some do’s and don’ts of scouting, how recognizing patterns is critical in scouting, how to differentiate between diseases and other problems and finally, the place of diagnostic laboratories and manuals in diagnosis.
Once you decide to start scouting, set up a regular schedule. It is not sufficient to ride by a field with the window down or look at the plants from atop a tractor. Make a point to set aside some time, say once a week, for scouting. If this seems undoable or the following seems pretty complicated beside the other items you have to know and keep track of (it is complicated!), it might be worth considering hiring someone to scout for you.
Items needed for scouting include: 1) plastic bags for sample plants, 2) a permanent marker to write on the bags, 3) a 10 or 15X hand lens, 4) a shovel to dig up plants, 5) a clipboard to write down observations, 6) digital camera (optional, more on this later). Better have a hat, some sunscreen and water.
Walk through your fields in a regular pattern; say a ‘Z’ pattern. Regardless of the pattern chosen, make point to go through the entire field instead of around the edges. It might be a good idea to be sure to hit areas that you suspect of problems. For example, a low area or an area where irrigation pipes leak might be more likely to have a soilborne disease such as Phytophthora. An area that gets shade from nearby trees might stay wetter in the mornings and have more foliar disease.
An effective scout will learn how to recognize patterns. Some patterns are obvious and do not indicate a problem. For example, plants of different planting dates will be different sizes. A bit less obvious might be why the plants in one area of a field are chlorotic (yellow) and stunted. This area of the field might have been too wet. Or a soilborne disease might be present. To determine the difference between these two possibilities, one might dig up a plant and examine the roots.
Before one can determine whether roots or any other plant part appears healthy, one must know what a normal healthy plant looks like. This is another key concept and will require one to find and carefully examine a few healthy plants.
Some patterns will be man-made. Irrigation, fertilization and cultivation will often create regular patterns which can be differentiated from the more or less random patterns produced by a disease. Foliar diseases often create lesions in a more a less random pattern on a leaf.
(Figure 1). Nutritional disorders, on the other hand, often manifest themselves along leaf margins or veins. Remember that old leaves often become chlorotic (yellow) or even necrotic (areas of dead tissue) as they senesce (die back naturally). However, if new growth begins to appear chlorotic or necrotic, there might be reason for concern.
Diagnostics
You may have learned to recognize a good many vegetable disease problems by sight. However, there may come a time when you observe a problem that you suspect might be a plant disease, but you aren’t sure. What do you do next?
One possibility is to compare your symptoms with those of a diagnostic manual or website. There are many excellent resources available.Many seed and pesticide companies produce excellent manuals. Your county extension agent should be able to point you to resources that your land grant institution might have.
.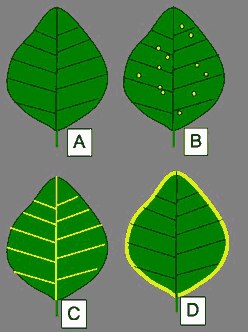
Figure 1: A diagrammatic representation of symptom types on a simulated leaf. A) Healthy leaf B) Scattered lesions in a pattern typical of an infectious disease. C) Veinal chlorosis typical of a nutritional disorder. D) Marginal chlorosis typical of a non-infectious pattern. Figure credit: Daniel S. Egel, Extension Plant Pathologist, Southwest Purdue Agricultural Center
It makes sense to compare several different websites and manuals. The more you know about your crop and the diseases that might be present, the better use you will be able to make of the resources available. Avoid quick comparisons of photos with your plant; a hasty conclusion might be a wrong one.
It might make sense to send your sample to a diagnostic laboratory. Before the season starts, find a diagnostic laboratory and determine their policies. Many states have diagnostic labs run by Extension; google 'your state' + 'plant clinic' or contact your local extension office to find a local or regional diagnostic laboratory.
Some general rules follow:
- Never pull a plant out of the ground for diagnostic purposes. Dig the plant up carefully, wrap the aboveground foliage separately from the roots and their associated soil, and send both bags by a next day courier.
- Don’t send in the worst plant in the field. Send in a plant that has symptoms that are just beginning to show. Dead plants tell no tales. If possible, send in a few plants with a range of symptoms from healthy to moderately diseased. Be sure to note details such as what service you want the lab to perform, the severity of the problem, size of planting, soil type, recent pesticide treatments, etc. Ask the diagnostic lab to tell you exactly what information they need from you to help them diagnose the problem.
Some diagnostic laboratories will accept digital photographs. Take the time to download your photos and look at them closely before submitting them. In my experience the biggest problems with digital photographs is they are either taken from too far away to show the details of the problem or they are out of focus. Make sure to describe what it is in the photograph that you want the diagnostician to notice.
This has been a very brief tour. Just one more thing: there are individuals at land grant institutions whose job it is to help farmers diagnose and manage diseases, as well as other pests and agricultural problems. If you have more questions, contact your state extension service.
References and Citations
- Howard, R. J., J.A. Garland, and W. Lloyd Seaman (eds.) Diseases and Pests of Vegetable Crops in Canada. 1994. Canadian Phytopathological Society. Available online at: http://phytopath.ca/publications/diseases-of-vegetable-crops-in-canada/ (verified 22 June 2015).
- Koike, S. T., P. Gladders, and A.O Paulus. Vegetable Diseases: A Color Handbook. 2007. American Phytopathological Society Press. Saint Paul, MN. Available at: http://www.shopapspress.org/vedicoha.html (verified 15 Mar 2010).